I must admit, from a sewing table perspective, I’m spoiled.
I learned to sew on my mother’s White sewing machine in a built-in cabinet. It looked very similar to this:

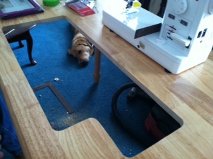
When I got my own Kenmore sewing machine shortly after I got married, my husband got me a great sewing machine cabinet to put it in. It has lots of storage and a hydraulic lift so you can use the machine flush with the table or on the table top for free arm sewing. When I got my Brother sewing machine, my husband modified the opening to accommodate my new machine. It looks like this:

When I got my new Babylock Jane, he tried to modify it again, but for various reasons it didn’t work. The machine is too heavy and it has a vertical bobbin that is awkward to access without the extension table attached. I’ve been using my Jane on the top of the old sewing cabinet. But as I mentioned, I am spoiled and I am used to sewing in a set in table. Also, I have been working on so many projects lately (including Leah Day’s Building Blocks Quilt Along) I thought it would be nice to have my Brother set up too. Less thread changing, foot changing etc. So I went on the hunt for a DIY sewing table. As predicted, Husband was not impressed with the Ikea table. Once he found a table he thought was suitable, the hard part was over. (The hard part for me, that is!)
Of course I forgot to take a picture of the table before we modified it, but here’s a link:
http://www.walmart.com/ip/Dining-Table-Natural/5924565
We began our project with a lot of staring, pondering, and planning (probably the most important step!), followed by a lot of measuring and a couple of trips to Home Depot and Harbor Freight.
Then it was time to break out the power tools!
Before we cut out the big hole for the machine Husband cut out holes at all the corners so we could have rounded edges.

“Duh” moment of the day: I was sent in search of a circle that would match the curves on the corner of my Jane. After a short hunt I found a prescription bottle, and as Husband drilled he mentioned that the proper tool for the job would be a stencil with all different size circles on it. My reply? “Oh yeah – I just bought one last week!” (I’ll be FMQ circles soon!)

In case you were wondering, the prescription bottle measured exactly 1.5 inches! (That’s all I’ve done with the stencil so far – good investment!)
Time to cut the big hole:
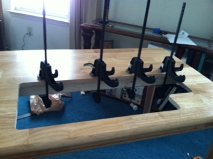
Next we cut some boards and attached them to the bottom of the table with construction adhesive and screws into the side of the table. We clamped them till the glue set. (well, till we were tired of waiting!)
Then it was time to cut a piece of birch to size and get out the nail gun. I always get nervous when the nail gun comes out but we managed to get the wood attached with no stray nails in the brain, eye, etc. Excellent!

Here’s the finished table, complete with a hole drilled for the wires and to accommodate the presser foot knee lift. I love it!

If you’re thinking about making your own sewing table, I say go for it! (says she who had her husband do it!) There are some important crossover skills between quilting and carpentry. In particular, the “staring, pondering, and planning” part. Also, the “measure twice, cut once” part. Although, in this case I would recommend “measure 5 or 6 times, cut once”. Fabric is a little less expensive to replace than a wooden table!
My husband hates when I talk about him on this blog. But on Valentine’s Day, I just have to. He has always indulged and spoiled me, whether it was buying me an awesome sewing cabinet at a time in our lives when it was a big extravagance, or taking the “easy little projects” I find for him and taking them to the next level. He always supports me and my crazy ideas whether they are small (thread holder) or big (starting work full-time at a time in life when most people are thinking of retirement). Love you, hon – thanks for being my Valentine!

I’m not sure why quilting husbands frequently are the butt of jokes. Mine like yours is very supportive, he has built me an iron table/system, does all my photography and encourages me in investing in good equipment and supplies. Your husband did a spectacular job with that table.
Thanks for the nice comment about my husband’s handiwork!
You’re one lucky girl. Your sewing cabinets are awesome just like your husband.
Hmmm…you got me thinking we have a nice computer table which we don’t use. I should look into it to see if I can modify that to be my sewing table. Any ideas?
Wow, beautiful table! You husband sounds an awful lot like mine, very handy and helpful with projects like this–not to mention plumbing and electricity. We are lucky ladies!
We are!
Hema check out Pinterest – I’m sure you can find something there. Thanks for visiting!
I made my sewing machine table out of TWO sheets of Baltic birch plywood! I’ve got 8 square feet to quilt on! I polyurethanes the piss outta it and it’s smoothe and fabric glides right across it!
Sounds awesome! I am limited somewhat by the size of my room, but if I’m quilting something big I have a couple folding tables I can set up behind and to the left go my table.
Excellent job. I’ll be referring my ZOORO to this blog, as I want the same done to the table I’m working on now.
Have fun!
I share your awesome luck and have a hubby who plays well with power tools 🙂 He did my tables from a basic Ikea pine table. With my help measuring of course. Your table is great!! Enjoy!